You can grow lettuce in recycled plastic bottles by cutting a 2-liter or larger bottle to create a planting cavity, drilling drainage holes, filling it with a lightweight potting mix, and sowing looseleaf lettuce seeds about 1/4 inch deep. Keep it in a spot with at least 6 hours of light, water when the top inch of soil is dry, and you can be harvesting leaves in as little as 4 to 6 weeks. If you want an even more contained setup, you can also learn how to grow lettuce in a mason jar using the same basic ideas for light, moisture, and drainage. It genuinely works, and it costs almost nothing to get started.
How to Grow Lettuce in Plastic Bottles: DIY Guide
Marcus Holloway
12 Jun 2026
Why plastic bottles are actually a smart choice for lettuce
Lettuce is one of the few vegetables that thrives in small containers. Its root system is shallow (usually 6 to 8 inches deep at most), it grows quickly, and it doesn't need a huge volume of soil to produce a real harvest. That makes plastic bottles a surprisingly good fit. A standard 2-liter bottle gives you enough soil depth and volume to grow one to two looseleaf plants all the way to harvest. Larger 3-liter or 5-liter bottles let you fit more plants or grow a slightly bigger head variety.
Beyond the practical sizing, bottles cost nothing if you're recycling them. You can line them up on a balcony railing, hang them on a fence, mount them vertically on a wall, or cluster them on a windowsill. They're lightweight, easy to move when weather changes, and when one gets cracked or discolored, you just swap it out. If you're comparing this to growing lettuce in a cup (which works for a single plant), bottles give you more root room and a bit more moisture retention, which matters in summer heat. If you specifically want to learn how to grow lettuce in a cup, the same basics apply for light, watering, and drainage. For someone who wants a small vertical garden or a row of planters without spending on pots, bottles are hard to beat.
What you'll need before you start
The materials list is short and most of it is probably already in your house or recycling bin. Here's what to gather before you start cutting anything.
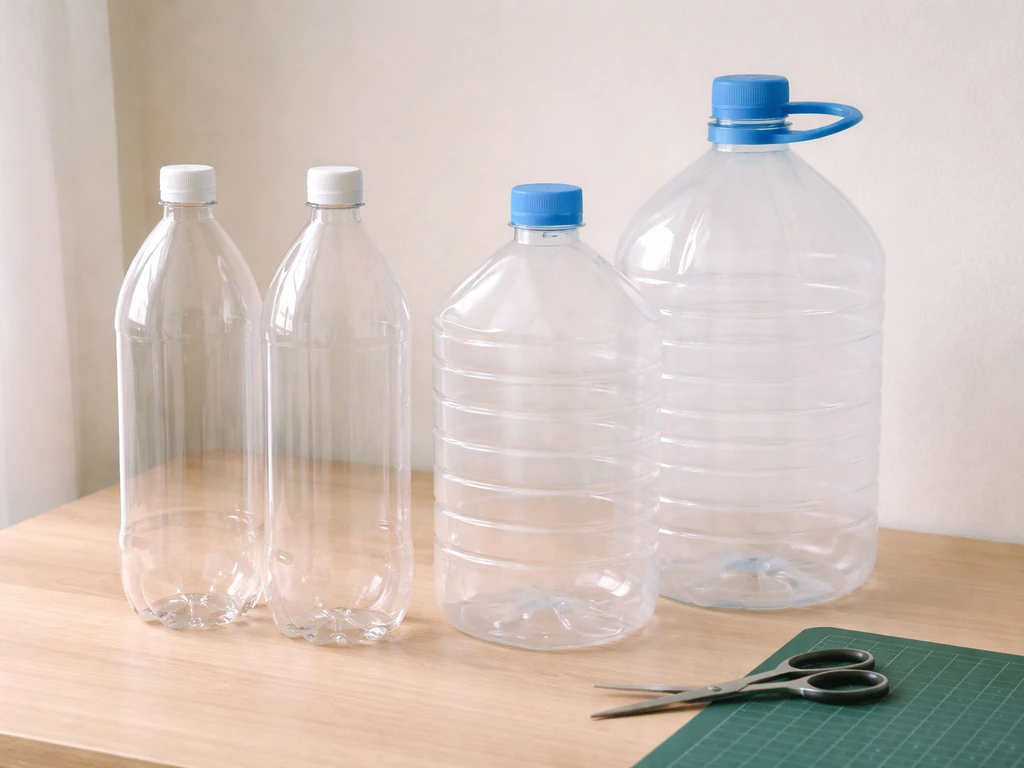
- Plastic bottles: 2-liter soda bottles are the most common, but larger 3-liter or 5-liter water/juice jugs give you even more growing room. Collect several so you can start a small batch.
- Sharp scissors or a box cutter/craft knife: for cutting the bottle opening. A heated nail or skewer works for poking drainage holes.
- A drill or a nail and a lighter: to make drainage holes in the bottom or sides of the bottle.
- Lightweight potting mix: look for a bagged mix labeled for containers or seed starting. Avoid heavy garden soil or topsoil, which compacts badly in small containers and chokes roots.
- Perlite (optional but helpful): mixing in about 20 to 25 percent perlite by volume improves drainage and keeps the mix from compacting over time.
- Lettuce seeds or seedlings: looseleaf varieties are the best starting point (more on this below).
- A liquid fertilizer: a balanced liquid feed (like a 5-5-5 or 10-10-10 diluted to half strength) for feeding after the first few weeks.
- A small watering can with a gentle rose head, or a spray bottle for seedlings.
- Wire, twine, or zip ties: if you plan to hang or mount the bottles.
One thing I want to flag early: do not put gravel, rocks, or broken pottery shards in the bottom of your bottle before the soil. This is a really common tip you'll see shared online, but it actually makes drainage worse, not better. Water moves through a continuous column of potting mix much more efficiently than it does when it hits an abrupt layer change. Skip the rocks entirely and just make sure your drainage holes are large enough and unobstructed.
Step-by-step: how to build your bottle planters
There are two main configurations for bottle planters: horizontal (bottle on its side with a long opening cut into the top) and vertical (bottle standing upright or inverted). Horizontal is the easiest for beginners and gives you the most planting surface area. Vertical works well for hanging setups and wall-mounted gardens. I'll walk you through both.
Option 1: Horizontal bottle planter (easiest for beginners)
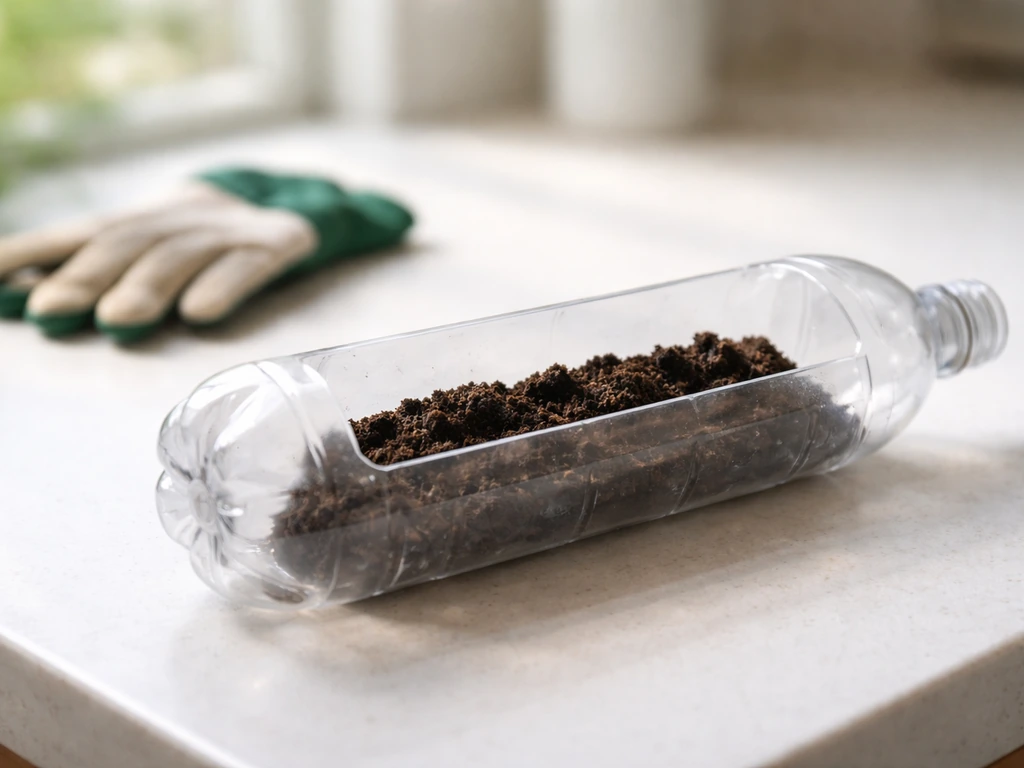
- Rinse the bottle thoroughly and remove the label. Let it dry for a few minutes.
- Lay the bottle on its side. Using a sharp box cutter or scissors, cut a rectangular or oval opening along the top (the side facing up). Aim for a window that's about 4 to 5 inches long and 2 to 3 inches wide. Leave at least an inch of plastic on either side of the cut for structural support.
- Use a heated nail, skewer, or drill to poke 4 to 6 drainage holes in the bottom of the bottle (the side now facing down). Make each hole about 3 to 5mm wide. Larger holes drain better.
- If you're hanging the bottle, now is the time to poke two small holes on either end (near the top edge of the bottle) and thread wire or twine through for hanging.
- Fill the bottle with your potting mix (with perlite mixed in if you have it) up to about half an inch below the cut opening. Don't pack it down hard.
- Sow seeds or plant a seedling (see the planting section below), then water gently until water runs out of the drainage holes.
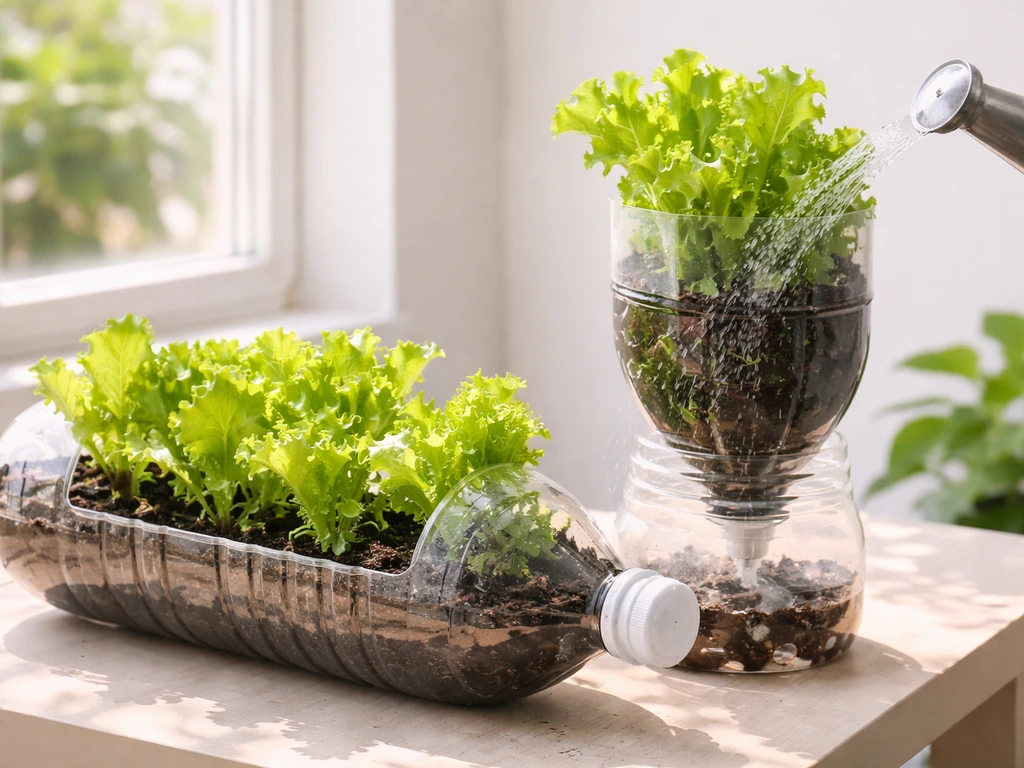
Option 2: Vertical self-watering bottle planter (great for indoors)
This setup is inspired by classic self-watering planter designs and works especially well on windowsills where you want less frequent watering. Cut the bottle roughly in half. Flip the top half upside down (cap removed) and nestle it inside the bottom half so the neck points downward. The top half becomes the planting chamber; the bottom half holds a water reservoir. Thread a strip of cotton fabric or a piece of rope through the bottle neck as a wick so moisture travels up into the soil. Fill the top half with potting mix, sow your seeds or add a seedling, and pour water into the bottom reservoir. Refill the reservoir every few days rather than watering from above. This setup is genuinely useful in warm indoor spots where small containers dry out fast.
Making drainage work every time
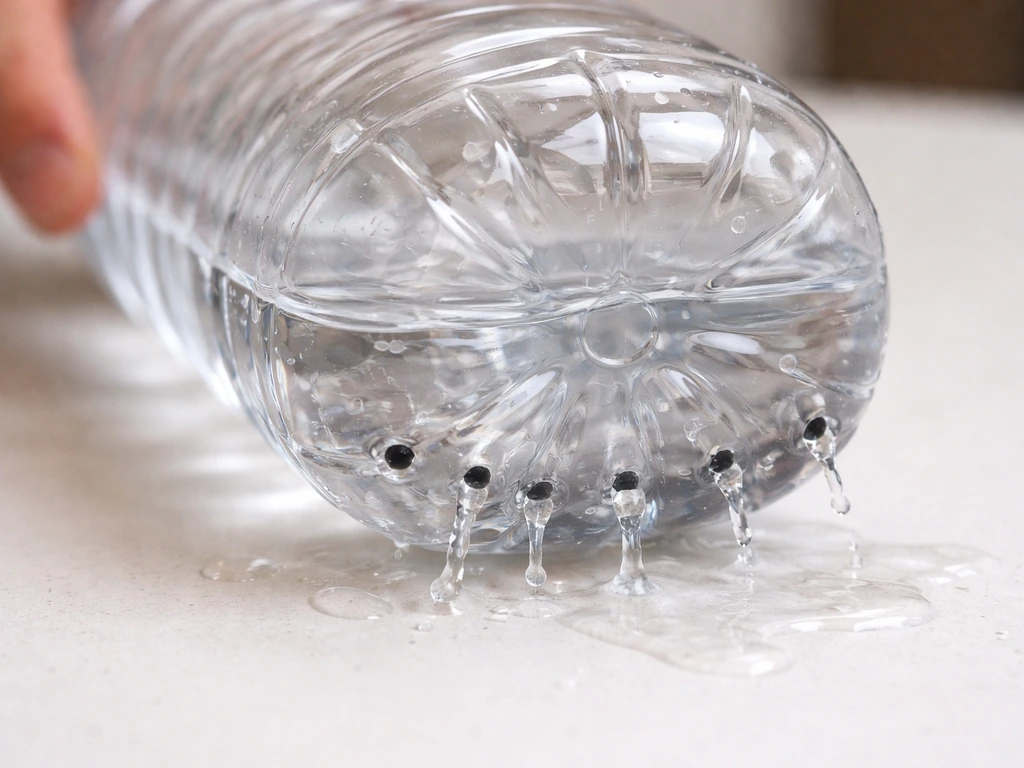
Every bottle you build needs drainage holes, no exceptions. Lettuce roots sitting in waterlogged soil will rot within days, especially in warm weather. For horizontal bottles, drill or poke the holes along the lowest point of the bottle (the bottom when it's lying down). For vertical upright bottles, holes go in the base. Aim for at least 4 holes per bottle, and err on the side of making them slightly larger rather than smaller. If you're placing bottles on a shelf or balcony and don't want water dripping everywhere, set each bottle in a shallow tray or cut the base off a second bottle to use as a drip tray.
Best lettuce varieties for bottle growing
Not every lettuce variety is suited to small containers. Butterhead and iceberg types that form large, tight heads need more root space and take longer to mature, making them less practical for bottles. Looseleaf and cut-and-come-again varieties are your best bet because they grow fast, stay compact, and let you harvest outer leaves while the plant keeps producing.
| Variety | Type | Days to First Harvest | Why It Works in Bottles |
|---|---|---|---|
| Black Seeded Simpson | Looseleaf | 45–50 days | Fast, productive, tolerates heat better than most looseleaf types |
| Oak Leaf (Red or Green) | Looseleaf | 40–50 days | Compact, slow to bolt, beautiful in a row of bottles |
| Tom Thumb | Butterhead miniature | 45–55 days | Bred specifically for small containers, forms a small head |
| Buttercrunch | Butterhead | 55–65 days | Slightly larger but manageable in 3-liter+ bottles, great flavor |
| Salad Bowl | Looseleaf | 45–50 days | Frilly, heat-tolerant, perfect for cut-and-come-again harvesting |
| Little Gem | Romaine miniature | 50–60 days | Compact romaine, works well in vertical bottle setups |
Direct sowing vs transplanting into bottles
Direct sowing is the simpler approach and works well with looseleaf varieties. Sprinkle 4 to 6 seeds across the surface of your prepared bottle planter and press them gently about 1/4 inch into the soil. Lettuce seeds need light to germinate, so don't bury them deeper than that. Keep the soil consistently moist (not soggy) and expect germination in 3 to 7 days at temperatures between 60 and 70°F (15 to 21°C). Once seedlings are about an inch tall, thin to one or two per horizontal bottle or one per vertical bottle by snipping the weakest seedlings at the soil line rather than pulling (pulling disturbs the roots of the ones you want to keep).
Transplanting seedlings you've started in a tray or bought from a nursery is faster to first harvest and makes sense if you're setting up mid-season or want a sure start. Gently loosen the root ball, make a small hole in the center of your bottle's soil, place the seedling so the root ball is fully covered, and firm the soil lightly around it. Water immediately. Transplants usually recover within 3 to 5 days and start pushing new growth.
Light, temperature, watering, and drainage in bottle systems
Light requirements
Lettuce needs a minimum of 6 hours of direct or bright indirect light per day to grow properly. Outdoors, place your bottles where they get morning sun and some afternoon shade, especially if you're growing in summer. Morning sun with afternoon shade in hot climates is close to ideal because it gives the plant enough light while protecting it from the heat that triggers bolting. Indoors, a south- or east-facing windowsill works in spring and fall. In winter or in rooms with limited natural light, a simple LED grow light positioned 4 to 6 inches above the plants for 12 to 14 hours a day will do the job.
Temperature
Lettuce is a cool-season crop at heart. It grows best between 60 and 70°F (15 to 21°C) and starts to struggle when temperatures consistently exceed 75 to 80°F (24 to 27°C). In small containers like bottles, the soil heats up faster than in ground beds, which makes managing temperature especially important. In warm weather, move your bottles to a shadier spot during the hottest part of the afternoon, or wrap the outside of the bottle with reflective tape or a light-colored cloth to reduce heat absorption. Bottle planters are genuinely easier to move than pots, so use that advantage.
Watering
This is where most beginners have trouble with bottle planters. The small soil volume means the mix dries out much faster than a large pot or garden bed would. In warm, sunny weather outdoors, you may need to water every single day. Indoors in a cool room, every 2 to 3 days might be enough. The rule I use: stick your finger about an inch into the soil. If it feels dry at that depth, water thoroughly until you see it draining from the holes at the bottom. If it still feels moist, leave it. Never let the soil dry out completely, as lettuce wilts quickly and stressed plants bolt faster. On the flip side, constantly soggy soil leads to root rot, which kills plants just as effectively. That proper drainage you set up earlier is doing important work here.
Spacing, nutrition, and keeping your setup productive
Spacing inside the bottle
For a standard 2-liter horizontal bottle, one looseleaf plant per bottle is the practical limit if you want full, healthy growth. You can push it to two plants if you're doing a cut-and-come-again harvest style and plan to keep the plants small. In larger 3 to 5-liter bottles, two looseleaf plants spaced about 4 to 6 inches apart works well. Miniature head varieties like Tom Thumb or Little Gem need the full interior of at least a 2-liter bottle each. If you're building a row or wall of bottles, space the bottles themselves 6 to 8 inches apart so the foliage isn't competing for light.
Feeding your bottle lettuce
A good quality potting mix has some starter fertilizer in it, but those nutrients get used up (and washed out through watering) faster in a small container than in a garden bed. Start feeding with a balanced liquid fertilizer about 2 to 3 weeks after planting. Use it at half the strength recommended on the package and apply it every 1 to 2 weeks. For lettuce, a nitrogen-forward formula (like a 3-1-2 or similar NPK ratio) encourages the leafy green growth you're after. Don't over-fertilize: too much nitrogen in a small container can actually cause soft, sappy growth that's more vulnerable to pests and rot.
Mulching and companion planting in a bottle system
You can add a very thin layer of fine mulch (like coco coir or fine wood chip) across the top of the soil in your bottle planter. It helps retain moisture and slows down how fast the top layer dries out, which is especially helpful outdoors in summer. Keep it to about half an inch so it doesn't smother small seedlings. As for companion planting, the practical reality in a bottle is that there's not much room for companions. However, if you have a cluster of bottles together, placing a bottle of basil or chives nearby can help deter some common lettuce pests like aphids. It's not essential, but it's a nice touch if you're building a small bottle garden.
When to harvest and how to fix what's going wrong
Harvesting timeline
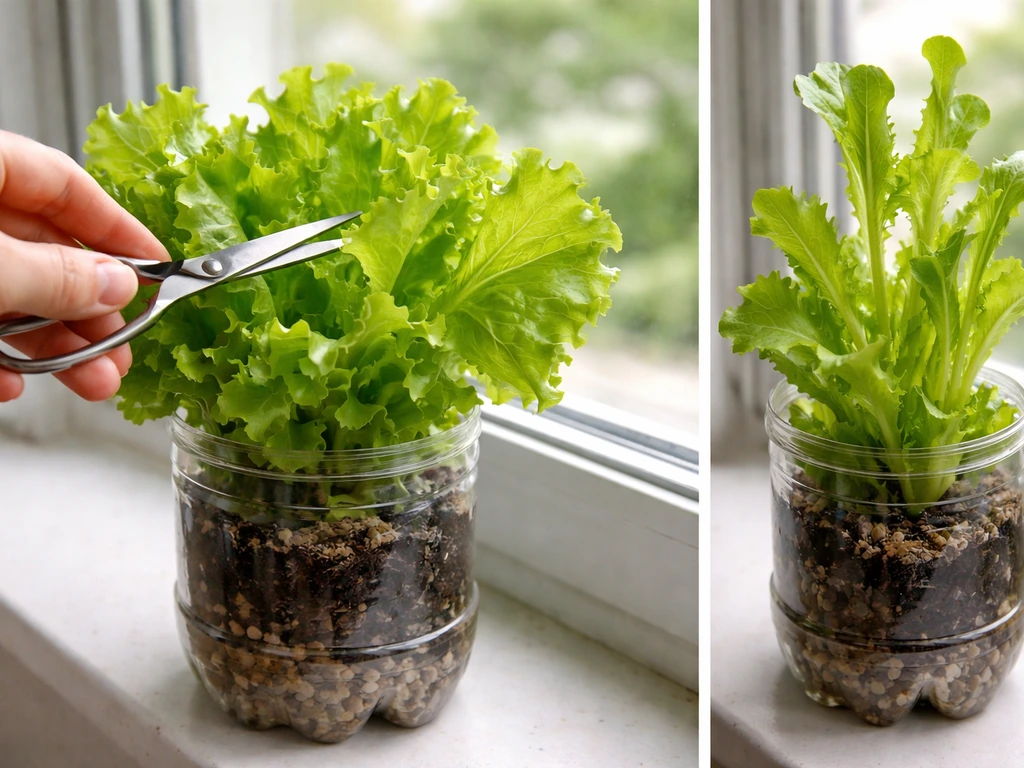
With looseleaf varieties, you can start harvesting outer leaves as soon as the plant has 5 to 6 mature leaves, usually around 4 to 5 weeks after germination. Use clean scissors and cut the outer leaves about an inch above the base of the plant, leaving the inner growth center untouched. The plant will keep producing new leaves for several more weeks. For mini head varieties, wait until the head feels full and solid (usually 6 to 8 weeks) and harvest the whole plant by cutting at the base. Don't wait too long: a lettuce plant that's been in a bottle for more than 8 to 10 weeks in warm conditions will almost certainly bolt.
Troubleshooting the most common bottle-planter problems
Here are the problems I see most often with bottle-grown lettuce and what to do about each one.
- Bolting (plant sends up a tall flower stalk and leaves turn bitter): This is triggered by heat and long days. If it happens, you can still eat the leaves immediately, but the plant is done producing good-tasting greens. Prevent it by choosing bolt-resistant varieties, keeping bottles out of afternoon sun in warm months, and harvesting regularly. Once a plant bolts, pull it and replant.
- Plant drying out quickly: This is normal in small containers, especially outdoors. Water more frequently, add a thin layer of mulch to the top of the soil, move bottles to a slightly shadier spot during the hottest hours, or switch to the self-watering vertical design described earlier. You can also double up the plastic by slipping one bottle inside a slightly larger one to add insulation.
- Root rot and wilting despite watering: If the leaves look yellow and limp and the soil is wet or smells bad, you have root rot from overwatering or poor drainage. Pull the plant, check the roots (healthy roots are white and firm; rotted roots are brown and mushy), and improve your drainage holes. Let the bottle dry out completely before replanting. Going forward, water only when the top inch of soil is dry.
- Aphids or whiteflies: Small bottle planters make pest inspection easy since the plant is right at eye level. Check the undersides of leaves every few days. If you spot aphids (small soft-bodied insects clustered on new growth), blast them off with a strong stream of water or wipe them off with a damp cloth. A diluted neem oil spray (a few drops in a spray bottle of water with a drop of dish soap) applied to the leaves in the evening works well as a repeat treatment.
- Slow or no germination: Lettuce seeds germinate poorly in soil that's too warm (above 75°F/24°C) or that has dried out even once during the germination window. Make sure you're sowing in temperatures between 60 and 70°F, keeping the soil consistently moist, and not covering seeds too deeply. If nothing has sprouted after 10 days, the seeds may be old or the conditions too warm. Try fresh seeds in a cooler spot.
- Leggy, pale seedlings: Not enough light. Move bottles closer to a window or add a grow light. Leggy seedlings grown indoors under low light will also be more vulnerable to disease.
Growing lettuce in plastic bottles is a genuinely forgiving project once you've got drainage and watering dialed in. The setup takes less than 30 minutes, the materials are essentially free, and you'll have a workable little garden going the same day. If you enjoy the bottle approach, it's worth exploring other compact container methods too, like hanging basket setups or PVC pipe systems, which follow many of the same principles but offer different spatial layouts for larger harvests. If you want a different setup, you can also learn how to grow lettuce in a hanging basket and use the same ideas for light, moisture, and drainage. Start with one or two bottles, see how your specific spot performs, and scale up from there.
FAQ
Can I reuse the same plastic bottle for multiple lettuce cycles without problems?
Yes, but rinse it thoroughly and let it fully dry before refilling. If the bottle looks cloudy, has a lingering smell, or developed algae on the inside, switch it out. Also replace the potting mix each season or top it off with fresh mix, since nutrients and structure degrade quickly in small containers.
What size drainage holes should I make, and how many are enough?
Go by hole size rather than just number. Aim for holes at least 1/8 inch (3 mm) so excess water can run out fast, and make about 4 holes minimum per bottle as a starting point. If you see water pooling after watering, enlarge the holes or add a couple more.
Do I need to keep the bottle clean to prevent fungus or algae?
It helps. If you grow on a windowsill or in humid indoor air, algae can grow on exposed surfaces. Avoid leaving wet residue on the outside opening, and consider using a light-colored cover or relocating the bottle slightly to reduce constant moisture on the rim.
How do I prevent lettuce from bolting in a bottle during hot weather?
Use shade timing and temperature control. Place bottles where they get morning sun and afternoon shade, and move them inward during heat spikes. If it still bolts, switch to a faster cut-and-come-again looseleaf type for the next planting, since it tolerates mild stress better than tight-head varieties.
Should I harvest in the morning or evening to reduce stress?
Morning is usually better. Leaves are more turgid before the day warms up, and your plants handle pruning better when temperatures are cooler. Use clean scissors, and avoid harvesting heavily during heat waves.
What’s the best way to water if my bottle planters are vertical and hard to reach?
For upright setups, water directly into the soil opening slowly until you see drainage from the base holes. If you use the wick or reservoir style, top up the reservoir instead of soaking the soil repeatedly, and check that the wick stays in contact with the mix so moisture moves consistently.
How can I tell if my potting mix is drying too fast or staying too wet?
Dry too fast when the top inch feels dry and wilting happens within a day, even after watering. Too wet when the soil stays cool, heavy, or smells sour, or when water takes a long time to drain and seedlings collapse. Adjust by improving drainage holes, watering less often, and refreshing the mix if it’s compacted.
Why are my lettuce seeds germinating poorly in the bottle?
Two common causes are burying too deep and inconsistent moisture. Lettuce needs light to germinate, so keep seeds only about 1/4 inch deep. Also avoid letting the top dry out for long stretches, since tiny seeds can die before they establish.
Can I start lettuce from store-bought seedlings or transplants in bottles?
Yes. Transplanting works well if you keep the root ball intact and water immediately afterward. In the first 2 to 3 days, keep the bottles out of harsh sun to reduce transplant shock, then gradually move back to your normal light spot.
What fertilizer should I use, and how do I avoid overfeeding in a small bottle?
Use a balanced liquid fertilizer diluted to half strength, starting around 2 to 3 weeks after planting. If growth turns overly soft or you see leaf burn at the edges, pause feeding for a week and ensure you are not constantly soggy. Small containers concentrate effects, so less is better than more.
Can I grow multiple lettuce varieties in the same bottle?
It’s not ideal. Different varieties can have different maturity timelines and spacing needs, and thinning becomes harder. If you want variety, keep one variety per bottle, or use clusters only when they share the same harvest style (like cut-and-come-again looseleaf).
Do I need grow lights year-round indoors?
Usually only when natural light is weak. If your windowsill provides less than about 6 hours of bright light, add a grow light. Also keep the light 4 to 6 inches above the plants and run it about 12 to 14 hours daily during winter or cloudy periods.
How do I thin seedlings correctly without damaging the survivors?
Snip instead of pulling. Cut the weaker seedlings at the soil line so you do not disturb the root zone of the ones you keep. After thinning, water lightly to settle the mix around remaining seedlings.