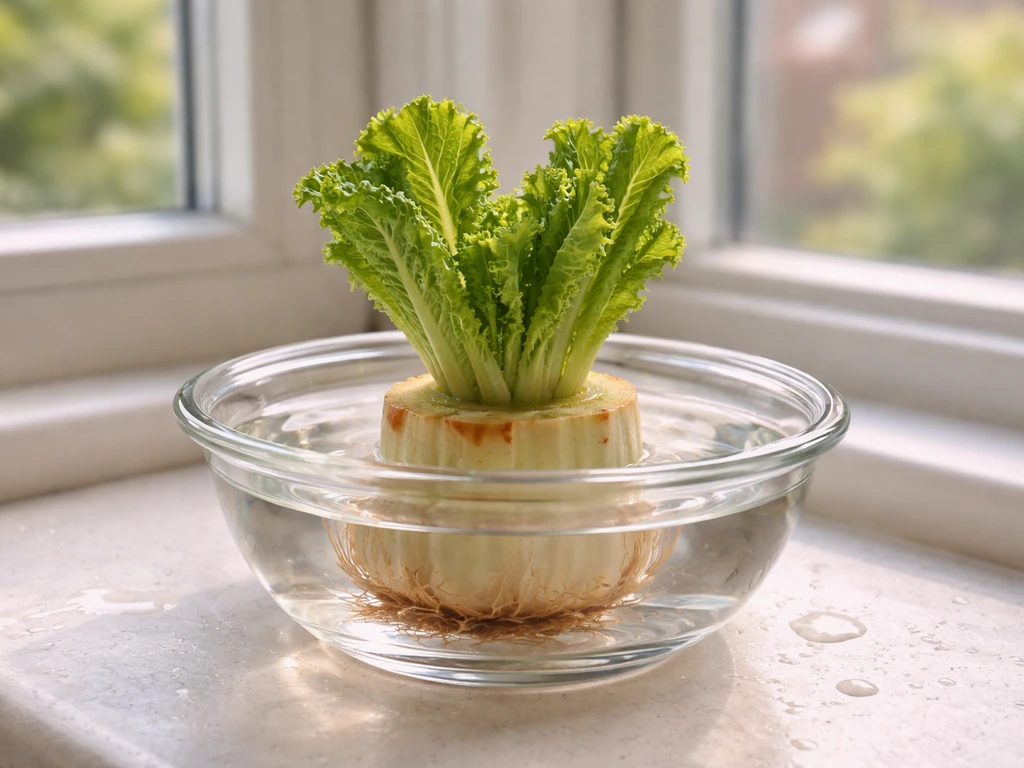
Yes, you can regrow romaine lettuce from scraps, and it works reliably if you do one thing right: keep the base intact. Take that cut end from the grocery store or your last harvest, place it in a shallow dish of water or plant it directly in soil, and within a couple of days you'll see roots forming and new leaves pushing up from the center. The catch is that you're not getting a full new head of romaine. Realistically, you'll get about 10 to 12 days of useful leafy regrowth before the plant either stalls or bolts. That's still enough for a few handfuls of fresh leaves, which is a decent return on a piece of lettuce you'd otherwise throw away.
How to Grow Romaine Lettuce From Scraps Indoors or in Dirt
Marcus Holloway
26 Apr 2026
What scraps actually work and what to expect
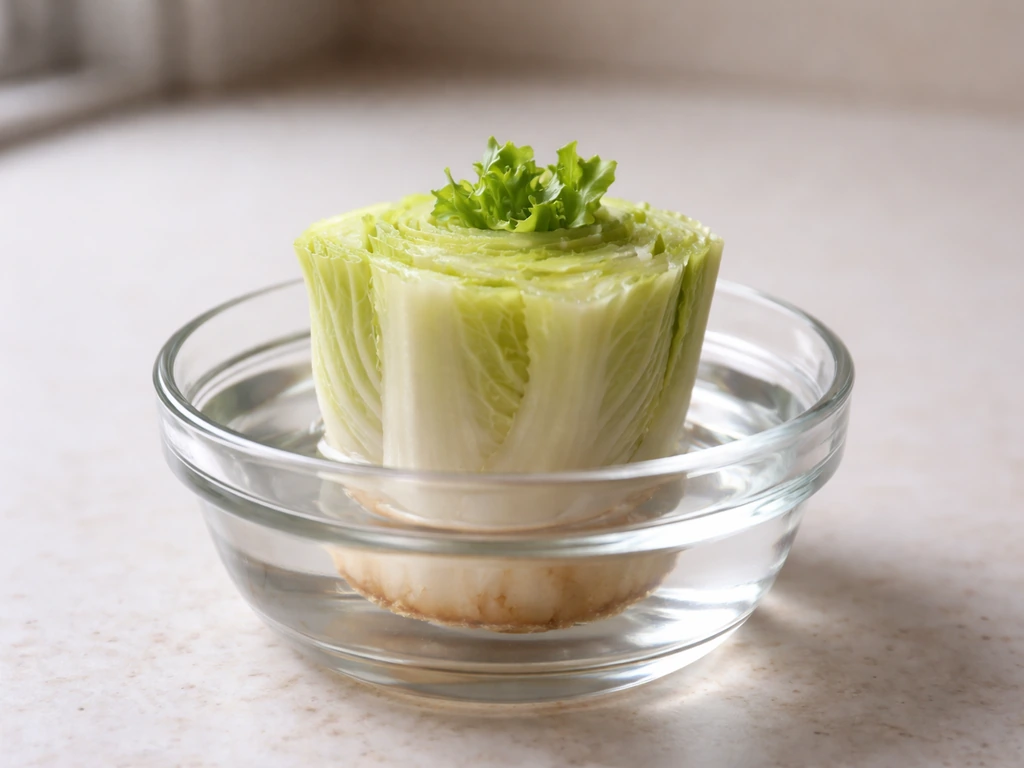
The part you want is the bottom inch or two of the romaine head, sometimes called the core, stump, or base. When you cut the leaves off, you leave behind this white or pale green section with its root nodes still embedded in the stem tissue. That's where the magic happens. Roots begin emerging from that cut surface within a couple of days, and new leaf growth follows shortly after.
Be honest with yourself about expectations before you start. The regrown leaves will be smaller than what you bought, and they can be slightly more bitter, especially as the plant ages. Romaine that's already been through one harvest cycle is working from stored energy, not a fresh seed, so it doesn't perform like a plant grown from scratch. If you want a full, productive romaine head, growing from seed is the better path. But if you want a quick, free batch of fresh greens from kitchen scraps, this method absolutely delivers.
One thing to watch for is bolting. As the scrap reaches the end of its useful life, it will start sending up a tall, narrow center shoot and the leaves will get thin and increasingly bitter. That's the plant trying to flower and set seed. When you see that happening, the scrap has run its course. Don't try to nurse it further. It's done.
Best setup for indoor scrap-growing
Romaine is a cool-season crop, and indoors that works in your favor. The ideal temperature for leafy growth is right around 60 to 65°F. Most homes run a little warmer than that, which is fine for the short regrowth window you're working with, but if your space is consistently above 70°F, the plant will push toward bolting faster. Texas A&M AgriLife Extension notes that temperatures above 80°F can retard heading and induce seed stalk initiation, which contributes to bolting. A spot near a cool window or in a basement works better than a hot, sunny kitchen counter.
Light requirements

Light is where most people go wrong indoors. Bright indirect light for 6 to 8 hours a day is the minimum. If you're relying on a windowsill and the regrowth comes in pale, stretchy, and flopped over, that's not enough light. For a proper indoor setup, aim for 14 to 16 hours of light from a grow light, kept about 6 inches above the tops of the new leaves. A 16-hour light cycle with 8 hours of darkness is the sweet spot. Running light for a full 24 hours can actually stress the plant, so give it a dark period.
Container and water setup
For the water-only method, a shallow bowl or wide-mouthed jar works well. You just need enough water to cover the bottom half inch of the base, maybe up to an inch. Deeper than that and you're inviting rot. For soil-based indoor growing, a small container at least 4 to 6 inches deep with drainage holes at the bottom is all you need. A single scrap doesn't need much real estate. If you're regrowing several at once, a rectangular planter or a standard 6-inch pot per base works well.
Step-by-step in dirt: prepping the cut end and planting depth
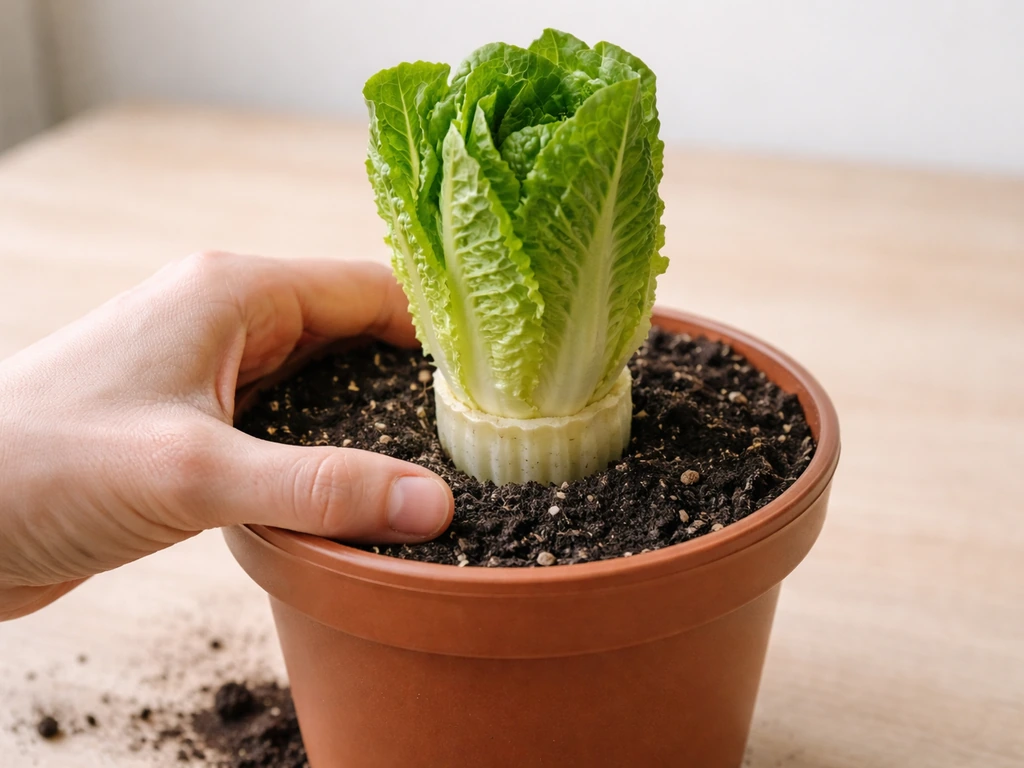
Planting the scrap directly in soil tends to produce better, longer-lasting results than the water-only method because the roots have something to anchor into and can actually absorb nutrients. Here's exactly how to do it.
- Cut your romaine to leave about 1 to 2 inches of the base intact. The cut should be clean and straight, not ragged. If you're working with a store-bought head, this is the bottom portion you'd normally discard.
- Let the cut surface air-dry for 30 to 60 minutes before planting. This helps the outer tissue firm up slightly and reduces the chance of immediate rot.
- Fill your container with a well-draining potting mix. A standard vegetable or all-purpose potting mix works fine. Avoid dense garden soil in containers because it holds too much moisture and will rot the base.
- Make a shallow impression in the soil and set the base into it so that the bottom half inch to one inch of the scrap is buried. The cut surface should be sitting in or just below the soil surface. Don't bury the whole base or you'll cut off air flow to the emerging leaves.
- Firm the soil gently around the sides so the base stands upright. It doesn't need to be packed tight, just stable enough that it won't tip over.
- Water lightly right after planting to settle the soil around the base, then move the container to your chosen light source.
Within 2 to 4 days you should see the center of the base begin to push new pale green or yellow-green leaves upward. By day 7, you'll usually have visible leaf growth of an inch or more. By days 10 to 14, you're at peak harvest time. After that, quality declines fast.
Watering and care routine
This is where most beginner attempts fail. The number one killer of scrap-regrown romaine is rot, and rot comes from too much water sitting against the base. Whether you're using the water method or soil, the goal is consistent moisture without sogginess.
Water method
Change the water every one to two days. Don't let it sit. Stagnant water grows bacteria fast, and a soft, slimy base means you've lost the scrap. Use room-temperature water. Cold water from the tap is fine, but ice cold can shock the base and slow root formation. Keep the water level shallow, just enough to touch the bottom of the base without submerging the cut surface.
Soil method
Water when the top half inch of soil feels dry to the touch. In most indoor conditions, that's every 2 to 3 days, but it depends on your container size, humidity, and temperature. The drainage holes in your container are not optional: water should flow freely out the bottom after each watering. If water pools and stays, your mix is too dense or the drainage is blocked. Empty the saucer under the pot after watering so the roots aren't sitting in standing water.
You don't need to fertilize during the short regrowth window. The scrap has enough stored energy to push out leaves without any added nutrients. If you're determined to give it a boost, a very diluted liquid fertilizer (half the recommended strength) once during the growth period won't hurt, but honestly it's not worth the effort for a 10 to 12 day crop.
Troubleshooting: what to do when things go wrong
| Problem | Likely Cause | What to Do |
|---|---|---|
| No regrowth after 5+ days | Base is dead, dried out, or rotting | Check the base: if it's slimy, start over with a fresh scrap; if just dry, make sure it has water contact or is in moist soil |
| Wilting new leaves | Not enough water, too much heat, or low humidity | Water more consistently and move to a cooler spot; misting the leaves lightly can help in dry indoor air |
| Mold or rot on the base | Too much moisture, poor drainage, or stagnant water | Remove any visibly rotted sections with a clean knife, let the cut dry briefly, and improve drainage or change water more frequently |
| Leggy, pale, stretched growth | Not enough light | Move closer to a grow light or a brighter window; aim for 14–16 hours of light at 6 inches above the leaves |
| Leaves turn bitter quickly | High temperatures or the plant starting to bolt | Lower the temperature if possible; harvest immediately before the center shoot elongates further |
If the base goes completely soft and mushy, don't try to save it. Toss it and start with a fresh scrap. It happens, especially the first time, and it's not a sign you can't do this. Usually it just means the water level was too high or the soil stayed too wet. Adjust and try again.
Harvesting and whether you can regrow it again
Harvest the regrown leaves when they're about 3 to 4 inches tall. At that point they're at their best flavor and texture. Use scissors or a clean knife to blank" rel="noopener noreferrer">cut the outer leaves first, leaving the inner center growth intact, similar to a cut-and-come-again approach. Leave at least an inch of stem above the soil or water line so the plant has material to continue growing from. This mirrors what works well in general lettuce harvesting, where leaving that bottom inch or two gives the plant a base to regrow from.
Can you regrow from the same scrap a second time? Sometimes yes, but don't count on it. After the first regrowth cycle, the stored energy in the base is mostly spent. Some scraps will push out a second round of small leaves, but they'll be thinner and less flavorful than the first batch. A third cycle almost never happens in any meaningful way. Treat the first harvest as the main event and any additional growth as a bonus.
When the base finally stops producing or bolts (you'll see a tall, narrow shoot emerging from the center with very narrow leaves), that's the end. The scrap has done its job. At this point, no amount of better light or watering will bring it back to productive leafy growth. Compost the base and grab a fresh scrap to start over.
If the scrap method has you interested in getting more serious about romaine, growing from a stalk or full core that's been allowed to root more deeply, or starting fresh from seed, will give you a longer and more productive growing window. Regrowing from scraps is a great introduction to how lettuce grows, but it's just the beginning of what's possible with romaine at home. Can you grow romaine lettuce from the stump Can you grow romaine lettuce from the stump? (related option).
FAQ
How do I know if my romaine scrap has started rotting versus just forming roots?
Roots look firm and pale, with a slightly translucent feel. Rot usually shows up as a wet, brown, or gray mush, often with an odor (sour or ammonia-like) and the base breaks down instead of staying intact. If it smells bad or turns slimy, discard immediately and lower the water level (or improve soil drainage) before trying again.
Do I need to change the light setup once the new leaves appear?
Keep light consistent. If the leaves come in pale or stretchy, move the setup closer to the grow light or increase daily hours to keep them stocky. Avoid sudden moves from low light to very bright light, because the center can slow or stall after a shock.
Can I regrow romaine scraps in a sunny window without a grow light?
Often you can, but only if the window is cool and bright enough for most of the day. If the new growth is limp or leaning heavily toward the glass, rotate the container every day and consider supplementing with a grow light for a few hours to prevent early bolting from stress.
What water should I use for the water-only method, and does tap chlorine matter?
Room-temperature water is best. Chlorine usually isn't the main issue, but stagnant water and warm, dirty conditions are. Use clean containers and refresh on schedule (every 1 to 2 days) to prevent bacterial buildup that leads to a soft base.
Should I trim any mushy parts if the base looks partly damaged?
Trim only if there is a small amount of dry damage and the remaining base is still firm and smells neutral. If the cut area is wet, slimy, or spreading, it will keep failing, so discard and restart with a fresh scrap.
Why are my regrown leaves bitter early, even though the scrap was fresh?
Bitter can happen if temperatures run warm or if light is insufficient. Try moving to a cooler spot (closer to the 60 to 65°F range) and increase light duration. Also harvest at 3 to 4 inches, because delaying harvest makes bitterness build up quickly.
How do I avoid bolting when my home stays above 70°F?
Bolting is mostly temperature driven. Use the coolest available location (basement, near a cool window, or a room with a steady AC), and shorten the cycle by harvesting at the first peak (3 to 4 inches). If you see a tall center shoot, stop trying to salvage it and compost the base.
What pot size and spacing should I use if I regrow multiple romaine bases together?
For water-only, keep each base separate so they do not contaminate each other if one rots. In soil, 6-inch depth per base is fine, but spacing matters for airflow. If leaves crowd and stay damp, quality drops faster, so give each scrap its own pot or keep at least a few inches of separation.
Can I use the regrowth leaves more like baby greens, and how should I store them?
Yes, you can harvest outer leaves and eat them immediately, or wait until they reach 3 to 4 inches for best texture. After cutting, rinse lightly and dry well, then store in a container lined with a paper towel to reduce excess moisture. Use within a couple of days for the sweetest flavor.
Will fertilizer help, or could it make the regrowth worse?
In most cases it is unnecessary, since the base already has stored energy. If you do add fertilizer, use a very diluted liquid only once, and only if the leaves are stalled but the base is firm and healthy. Overfeeding can stress the plant and promote soft, weak growth during the short 10 to 12 day window.